Managing Applications
EDP offers functionality to manage the most atomic software components that form an application: users can upload bundles and have them validated according to the OSGi specification; they can have them accelerated, installed into, or uninstalled from, runtimes. Users can also steer these components’ activities by starting or stopping them.
Features allow users to structure their applications hierarchically, package them in versions and deploy them in a user-friendly manner to one or more runtimes or runtime groups.
A feature consists of one or more bundles and/or other features. Because features can be combined with multiple other features, the re-usability factor is significantly enhanced. Users can build their applications as bundle groups in a very modular way.
EDP follows the OSGi Feature Specification.
Bundles & Features
The menu option Bundles allows users to upload, browse and inspect a list of all bundles in various phases, either as “snapshots” that still need to be tested or as final versions. Note that, currently, bundles can only be uploaded in the “Develop” environment.
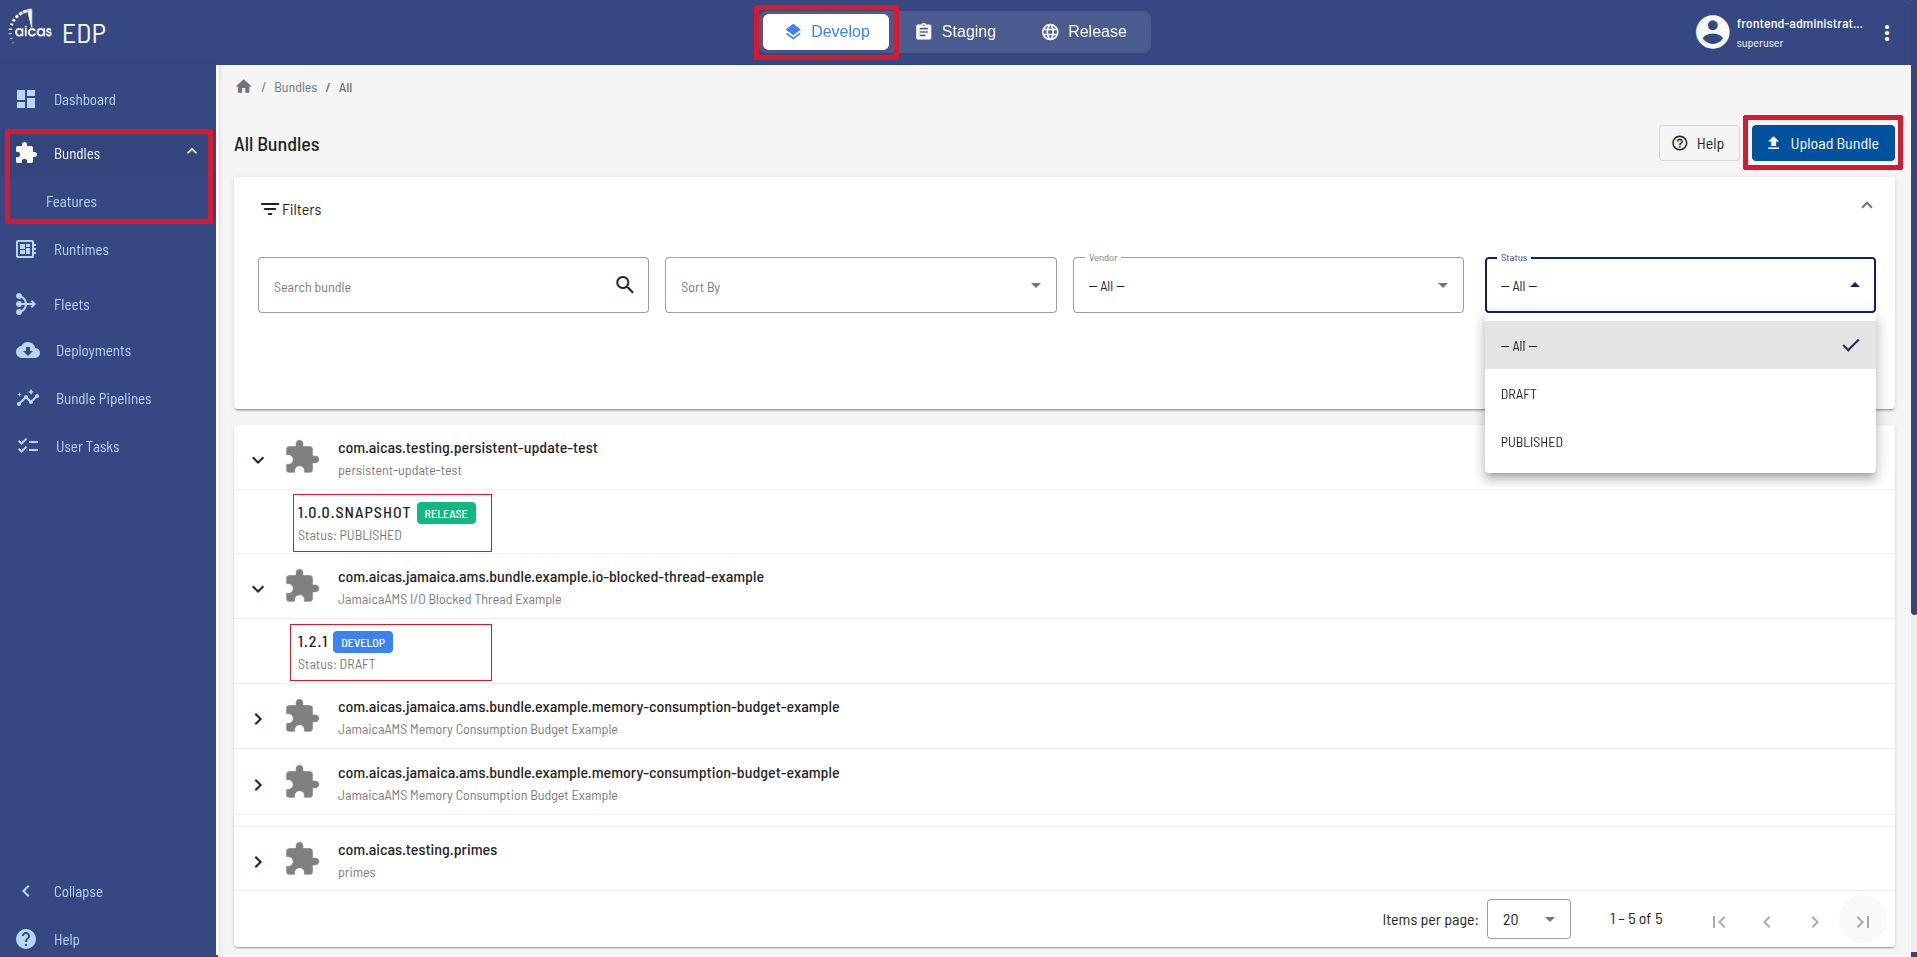
Upload, search and inspect versions of available bundles.
Users can also search for existing features, create and group new ones. Features can have multiple versions and all references between them and other features or bundles are done via specific versions.
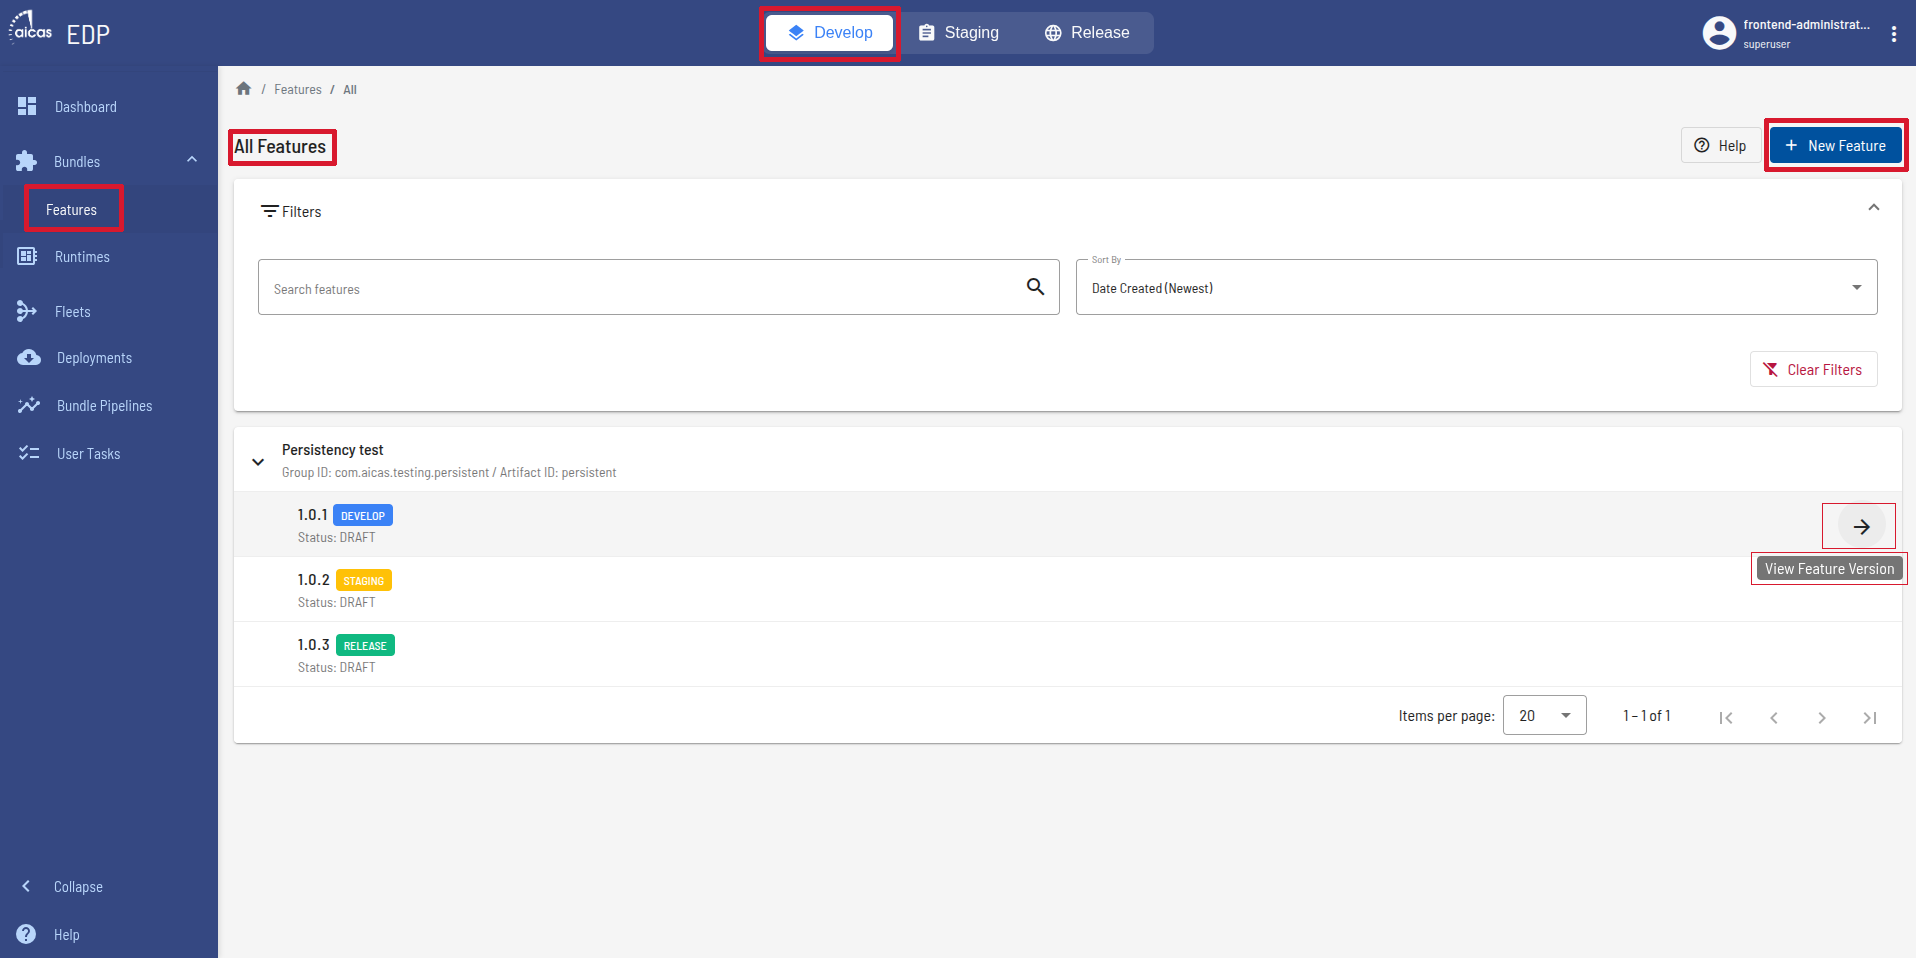
Filter, clap versions and edit features
Each artifact may be available in several versions, and each version can have different system requirements. Older versions of bundles and features are kept in the lists since they could still be used by runtimes or be dependencies for other bundles or features. Likewise, a bundle can have several accelerations associated with it, and those could be useful for different platform requirements.
Populate the Feature
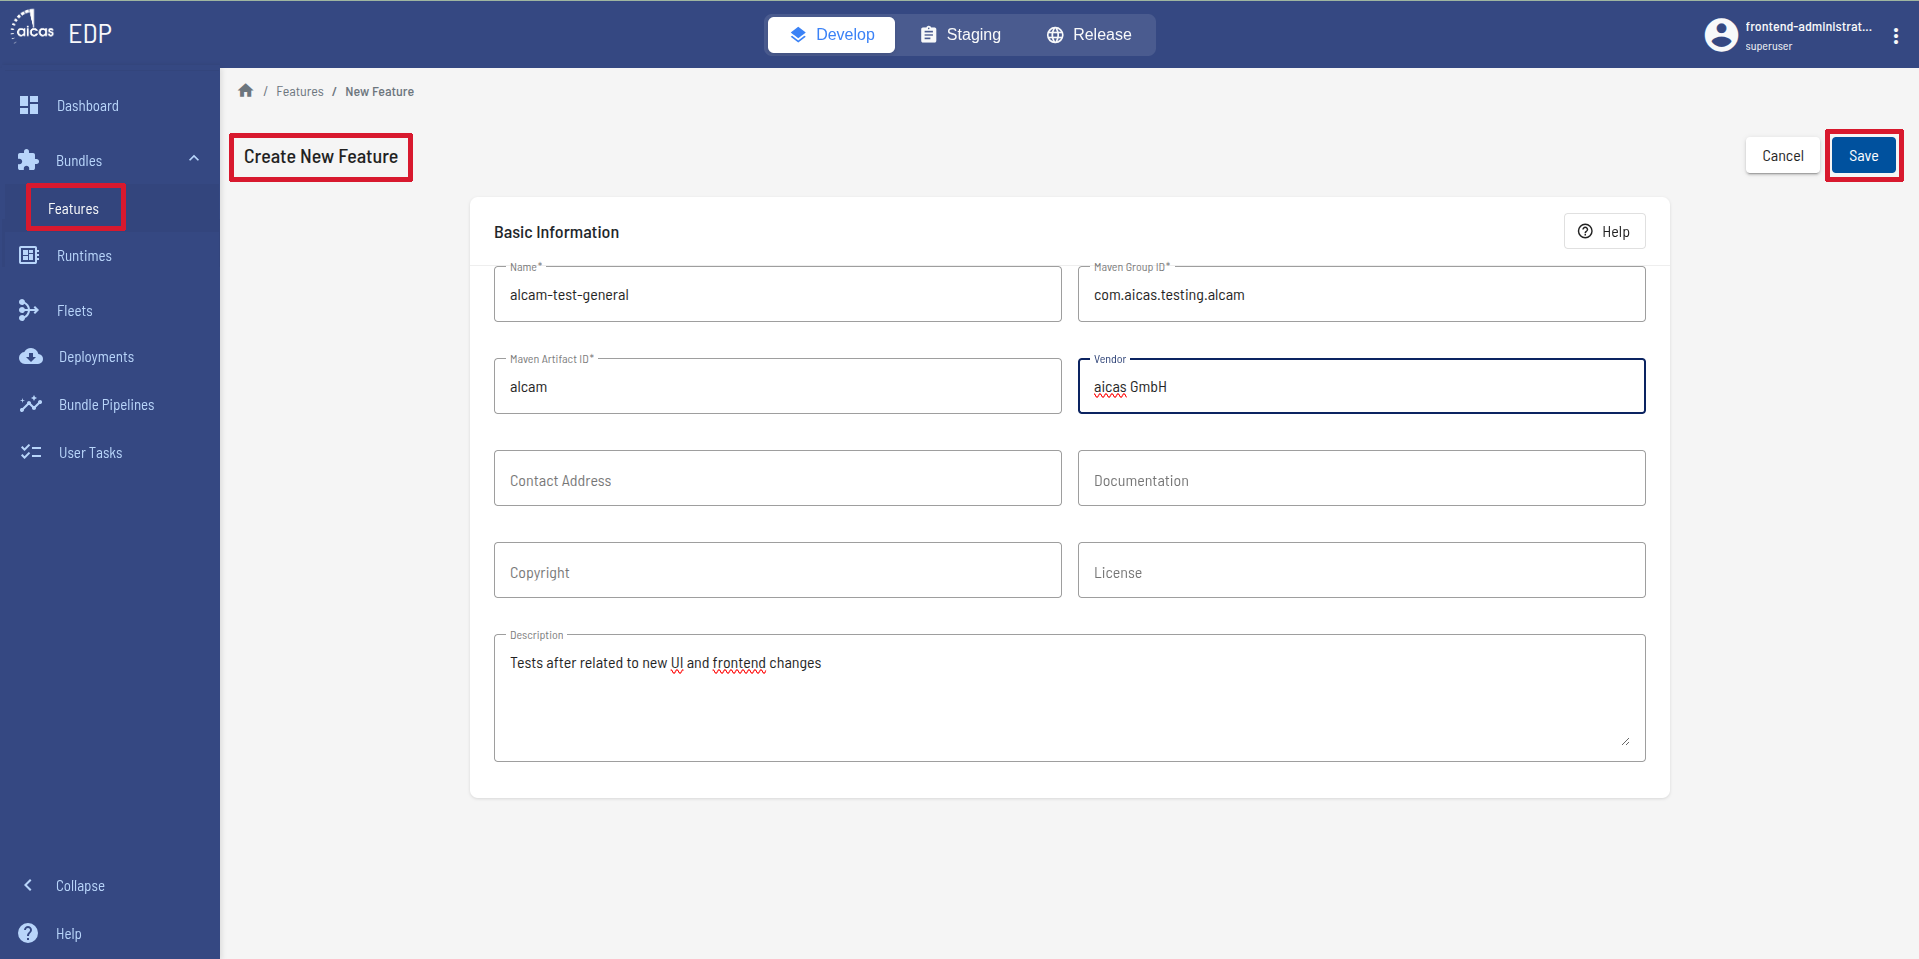
Create a new feature: a simple step.
After saving the new feature, users are offered the possibility to add draft versions to it.
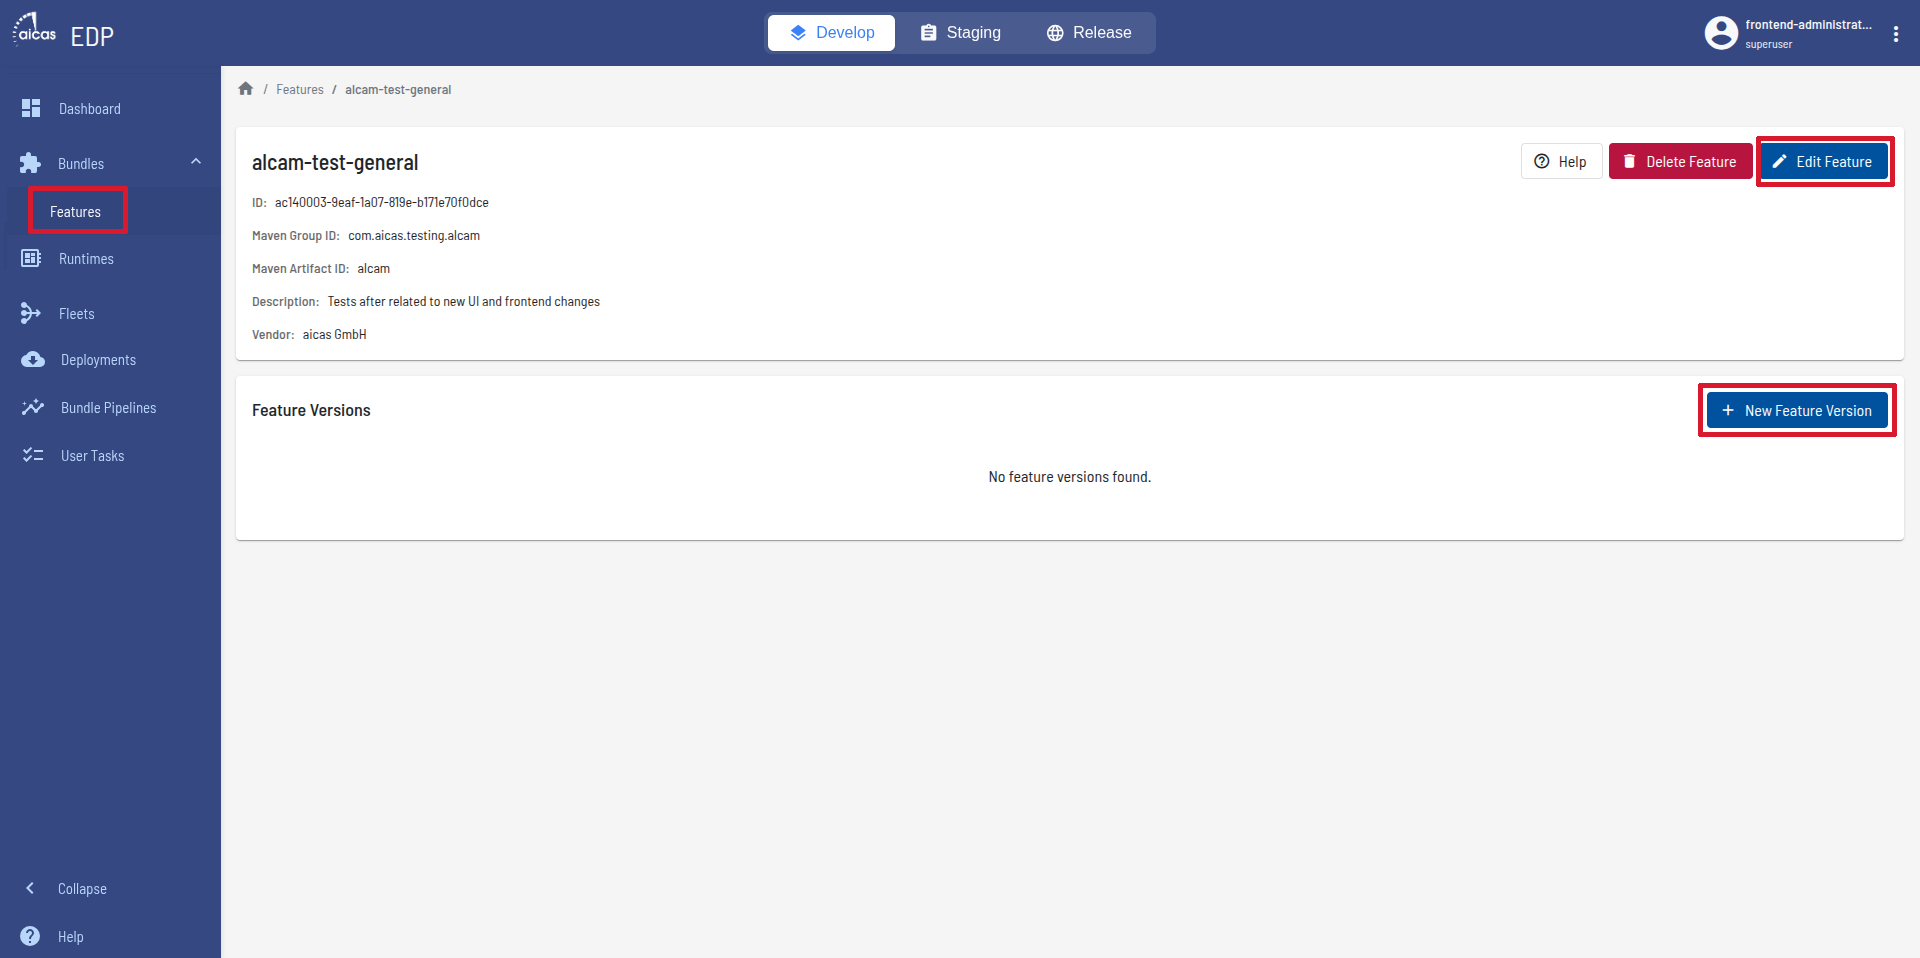
Add a new version, that will contain bundles and features.
Start an initial version by giving it a name and choosing a status, e.g. “draft”. Now you can populate the feature version with bundles or other features. In order to do that, just search and filter through the list of available components.
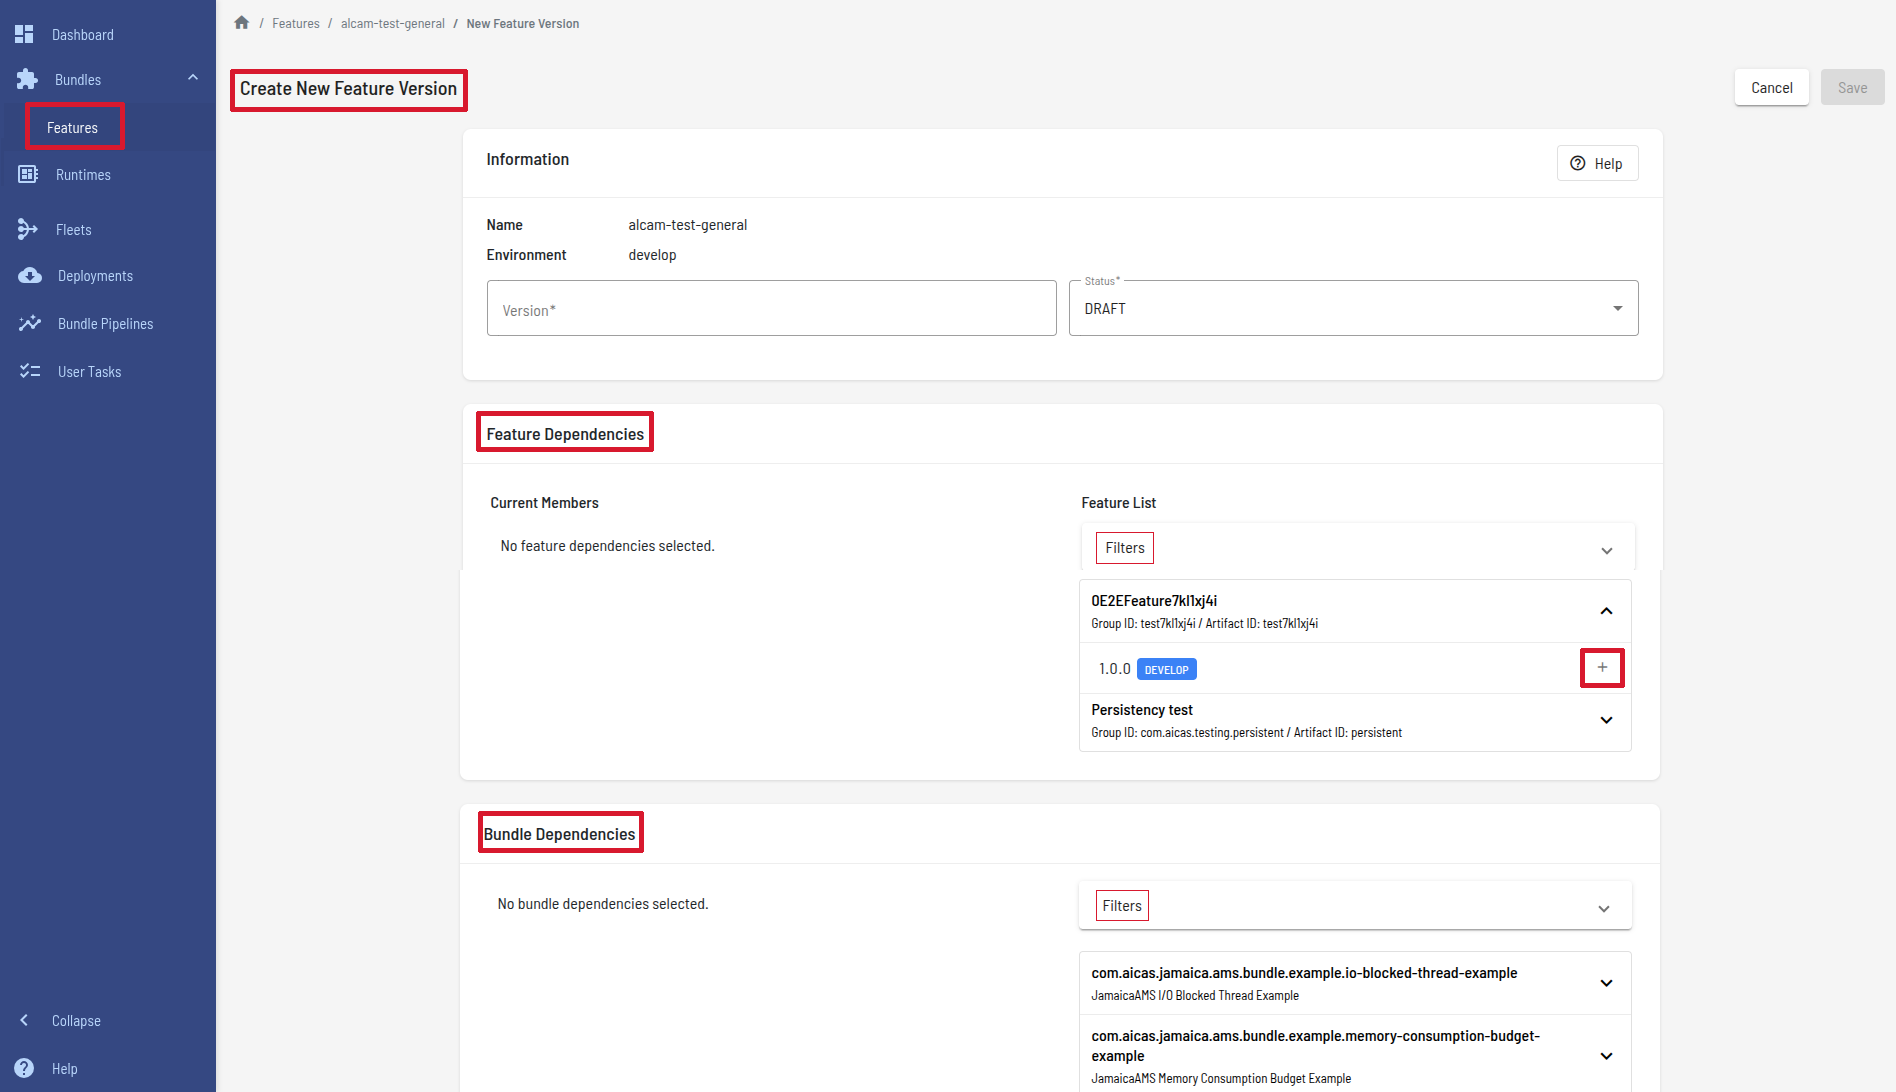
Add versions of bundles and features.
After finding a bundle or a feature that you want to add to the new component, just unfold the arrow that exposes its versions and click on the “+”. The corresponding bundle or feature will be moved to the left, integrating the box “Current Members”.
Repeat the process and see how the list will show all chosen elements that you wish to include in the new feature’s version. If you decide to give up on any of the elements - bundle or feature - just remove them.
After saving, the new feature will be listed and can be unfolded to show its building blocks.
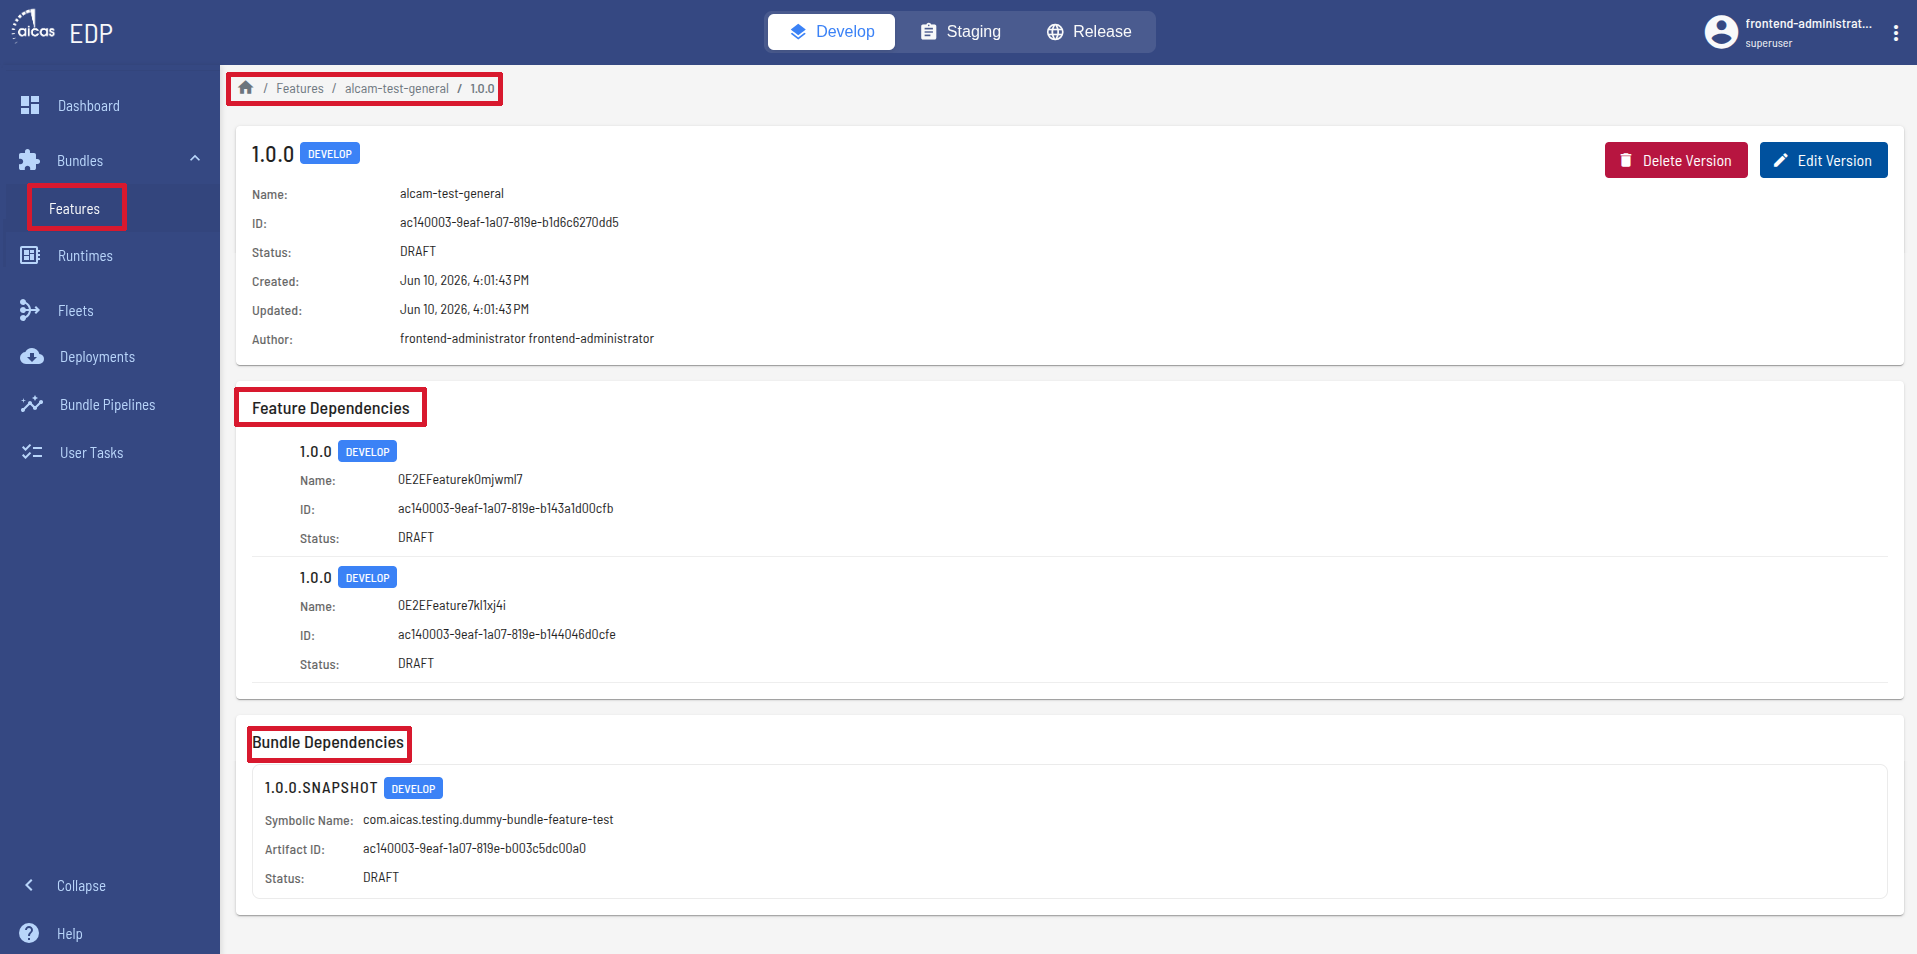
The version of the feature is listed with all its dependencies.
Once a component (version of a bundle or a feature) is assigned as dependency on another component, it cannot be deleted anymore.
Features and bundles can be aligned in a predefined (yet configurable) sequence of processing steps, referred to in EDP as bundle pipelines. Each bundle artifact that is added to EDP shall pass all required steps of a preconfigured pipeline.
State & Status
EDP permits monitoring of bundle artifacts in different ways, depending on the area of the web portal users find themselves in.
In Runtimes, users can track the OSGi life cycle state of the bundles in a specific device, like “ACTIVE” or “RESOLVED”. Under Bundles, the bundle availability list permits filtering only the components that have “published” or “draft” status, for example.
When a specific bundle is selected, its status can be chosen out of a drop-down menu containing the values draft, published, rejected or archived. Once a bundle is rejected, this component will be archived, but it can no longer be deployed or selected as building block to new features.
While users can manually change a software component’s status, automatic adjustments can be triggered out of bundle pipelines. There, status determines which action nodes are allowed: for example, the status “published” is a prerequisite for a component to be promoted, i.e. transitioned from develop to the environments staging or release. Similarly, in general artifacts can only be deployed into a runtime after being published. An exception is made for the environment develop, where drafts are also deployable.
Besides general states like STARTED or FINISHED, in the Bundle Pipeline area users will find information about the user tasks applied to artifacts. This information is displayed when, in a BP family, users choose to view the execution of a specific revision. It can refer to tasks around acceleration or deployment. For example: ACCELERATION.STARTED, ACCELERATION.FAILURE, ACCELERATION.TIMEOUT, ACCELERATION.SUCCESS, DEPLOYMENT.STARTED or DEPLOYMENT.FAILURE.
Bundle Acceleration
Each artifact can have accelerated versions, intended for a particular platform. The presence of an accelerated version in the bundle list shows that the bundle has successfully completed an acceleration step in the bundle pipeline and can be downloaded for use on devices of a specific architecture. By acceleration step is understood that the aicas tool JAR Accelerator was run with predefined parameters to optimize the execution performance.
Acceleration
Jamaica JAR Accelerator is an aicas tool that takes a bundle’s JAR and produces a new, accelerated file with improved execution times for a specific target. This file incorporates the original source, complemented with a shared library containing methods in classes of the JAR that have been compiled to machine code. The library is identified with the platform for which it is intended. When a class from the accelerated JAR is loaded by an executable program running on a matching platform, the shared library is automatically linked with that program. The integration of the JAR Accelerator is possible only for bundles running on devices powered by aicas’ JamaicaAMS.
The definition of platforms that support bundle acceleration is a task that EDP administrators perform right after deployment. By clicking on JAR Accelerator Targets in the Settings menu, users with the required permissions can define on which platforms acceleration will be possible.
By setting a JAR Accelerator target, mandatory fields must be completed, like family and revision. The field classifier shows a string composed of information like platform and variant. As it happens with other mandatory parameters, the classifier value is defined in the AWS console, during EDP deployment, while configuring the AWS cloud formation template. This information can be later edited or deleted.
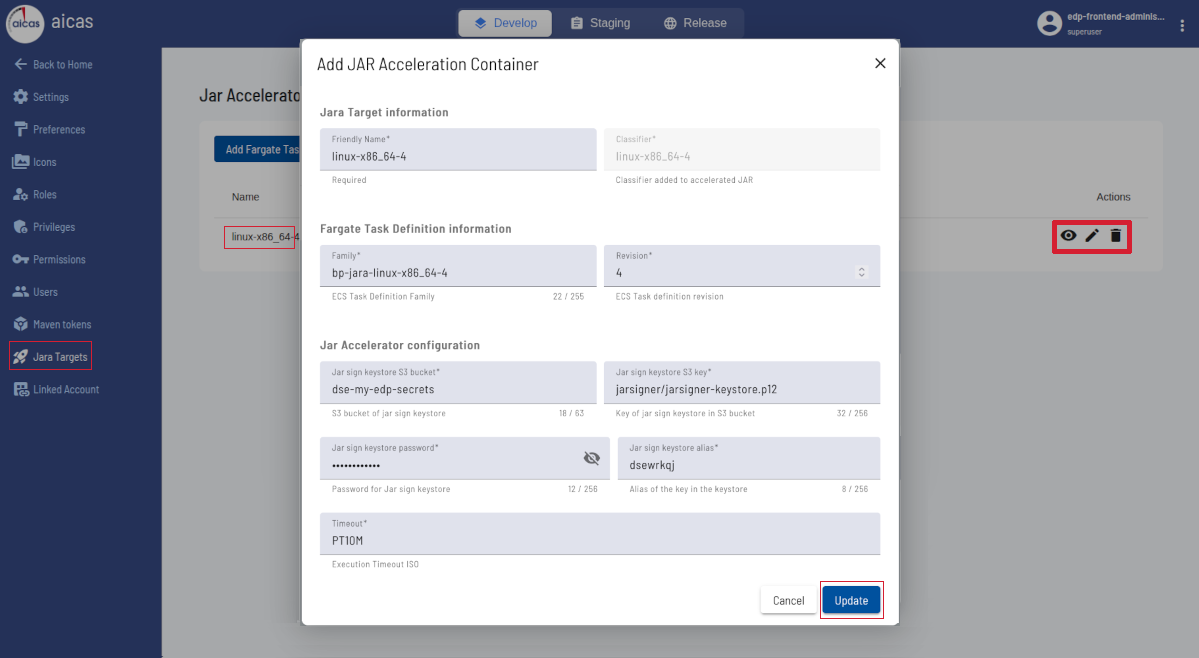
Adding a Fargate task to define JAR Accelerator targets
Note that the timeout, initially defined during deployment, follows the ISO 8601 format for time duration: P designates Period, T designates Time, and 10M stands for 10 minutes. This value can be changed.
Currently, EDP supports linux-x86_64-4 as JAR Accelerator classifier, where “4” represents the Application Binary Interface (ABI) version 4. In the future other platforms are planned to allow dynamic acceleration.
Here are some relevant aspects around bundle acceleration:
After a bundle is uploaded in EDP, users can apply a bundle pipeline which accelerates it for x86_64, which is the default architecture for optimization purposes.
When users select a device and choose to install a bundle, EDP preferably installs an accelerated bundle, if applicable. Users can verify whether a specific bundle has accelerated artifacts by selecting it in the bundle list shown in Bundles.
For a target, for which no accelerated version of the chosen bundle is available, EDP will install a regular, not accelerated version.
Updating JAR Accelerator Targets after EDP Updates
When EDP is updated, the ECS Task definition for JAR Accelerator targets changes automatically. As a result, the Jamaica JAR Accelerator (JARA) is no longer able to accelerate bundles until the JARA target configuration is also updated to match the new task definition revision.
ECS and EDP revision
Elastic Container Service (ECS) is a container orchestration functionality from AWS, that supports deployment and management. Each EDP component is deployed as an ECS service (EC2 instance).
The first step to restore bundle acceleration is to find the new revision in the AWS console → ECS → Task Definitions. This is the number shown after the colon (see image below).
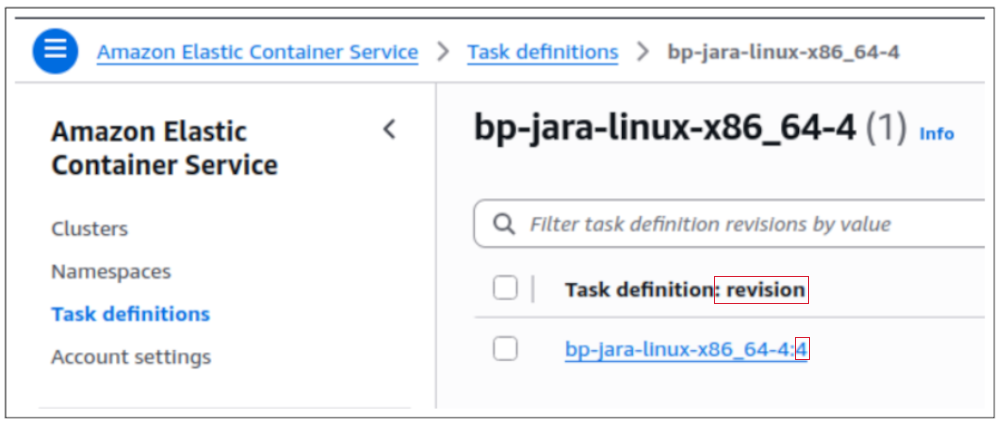
Find the new revision number in AWS / ECS Task Definitions
Then please proceed as follows:
Navigate to Settings → JAR Accelerator Targets in the EDP web portal.
Locate the existing JARA target entry that needs to be updated and click “edit” to change the configuration.
Update the revision field to match the new ECS Task definition revision number that was created during the EDP update.
Save the changes to apply the updated configuration.
Please note that
Bundle acceleration will not function until the JAR Accelerator Target revision is updated to match the current ECS Task definition. Existing bundles that were previously accelerated will remain functional, but new bundle uploads will not be accelerated until this configuration is corrected.
After updating the JAR Accelerator target configuration, newly uploaded bundles will resume automatic acceleration for the configured platform targets.
Uploading a Valid Bundle
To upload a bundle in EDP’s web portal, access the menu Bundles and choose the
Upload option. After a bundle is selected, EDP will access its manifest, expecting to find
the OSGi headers symbolic name and version, which are considered mandatory. In case those
headers are missing, EDP will reject the JAR as being a non valid OSGi bundle.
Using Maven
Sometimes users who are developing bundles from their local environment setups, for example an IDE like Eclipse or IntelliJ, might want to use Maven to deploy their bundles directly to EDP. To do that, users must start by creating a token.
In the menu Settings, choose Maven tokens and “Add token”. Then enter a name and
expiration date. Click Save and your personal token will be generated. This token needs to
be stored, since it will be used by Maven for the secure authentication operations required to
upload bundles.
Maven Configuration
Once the token is created, it is necessary to configure Maven. This can be done by entering all Maven-related information in the IDEs’ Maven plugin settings. Another option would be to use the command line interface, as shown here.
In this case, Maven’s default settings need to be properly changed. Below is an example of Maven settings.xml with the necessary additional information, which could be replaced with other values.
<settings>
   <servers>
     <server>
       <id>jedp</id>
       <configuration>
         <httpHeaders>
            <property>
              <name>jedp-mvn-user</name>
              <value>your-edp-username</value>
            </property>
            <property>
              <name>jedp-mvn-org</name>
              <value>edp-organization</value>
            </property>
            <property>
              <name>jedp-mvn-token-name</name>
              <value>maven-token-name</value>
            </property>
            <property>
              <name>jedp-mvn-token</name>
              <value>generated-token</value>
            </property>
         </httpHeaders>
       </configuration>
     </server>
   </servers>
</settings>
If you do not want or cannot use the global settings, you can provide settings.xml with the following mvn command:
mvn -s <path>/settings.xml -U clean deploy
Changing pom.xml
When Maven is used, each bundle is packed with a pom.xml file that specifies its properties and dependencies. Change the OSGi bundle’s pom.xml accordingly, updating host and environment, and make sure to support continuous development by adapting the URL of the snapshot repository.
<project>
   <repositories>
     <repository>
       <id>jedp</id>
       <url>https://<your-company-edp-domain>/maven/develop</url>
     </repository>
   </repositories>
   <distributionManagement>
     <repository>
       <id>jedp</id>
       <url>https://<your-company-edp-domain>/maven/develop</url>
     </repository>
     <snapshotRepository>
       <id>jedp</id>
       <url>https://<your-company-edp-domain>/maven/develop</url>
     </snapshotRepository>
   </distributionManagement>
</project>
From the point of view of developers, establishing a direct bridge between their IDEs and EDP using Maven is a faster way to upload their final artifacts.
With a single command they can clean, package and deploy a project, with no extra steps. Otherwise they would need to work on the code, build and export the jar; then go to EDP portal, choose Application, click “upload”, select the bundle and confirm. Only then the bundle would be listed in the EDP portal, reported as uploaded by the respective user.
Also in case the developer needs to upload a same bundle many times, after modifications or bug fixes, the direct IDE-EDP way speeds up the process considerably.