Connecting Devices
This section will detail features of the EDP Client and give information about provisioning of multiple devices. Furthermore, it will show how devices can be connected to EDP. Raspberry Pi will be used as device, and Apache Felix and JamaicaAMS will be taken as OSGi framework examples.
For details on connection settings when using Karaf or Equinox, please contact
info@aicas.comRuntime and EDP Client
For users to connect their devices to the EDP web portal, the first step would be to download the OSGi framework, also referred to here as runtime. The framework must be installed on the edge devices, and is capable of running on various combinations of hardware architectures and operating systems.
Also central to the connection is the EDP Client, an OSGi bundle that relies on the underlying OSGi framework for most of its functionality.
Basic OSGi Component
A bundle is the basic component of an OSGi framework. It is simply a JAR file containing a manifest and some combination of Java classes, embedded JAR files, native code, and resources. A bundle may provide some specific functionality for the user, or it may implement a service that other bundles can use. Bundles can only use functionality from other bundles through shared services and packages.
This client bundle establishes the link between the runtime and the EDP web portal. It can be downloaded from the web portal, either as a bundle alone or in combination with the OSGi framework. More details on the download procedures can be found in section Registration and Provisioning.
The EDP Client is currently compatible with the following OSGi-based frameworks:
JamaicaAMS : <https://www.aicas.com/wp/products-services/jamaicaams/>
Apache Felix : <https://felix.apache.org/documentation/downloads.html>
Eclipse Equinox : <https://projects.eclipse.org/projects/eclipse.equinox>
Client Features and Structure
The client comprises artifacts that bind together functionalities and dependencies as OSGi bundles, compatible with the runtime in the devices. It contains the implementation of basic EDP features and is responsible for reporting information about the runtime to the portal.
As client-side feature, the handling of secure MQTT connectivity with EDP enables IoT runtimes to automatically connect and make subscriptions and publications to MQTT topics, e.g., publishing runtime static and dynamic properties .
The Named Shadows feature enables to control a runtime using AWS IoT Named Shadows. Shadows can store the runtime’s state information and make it available to AWS services and custom apps, whether the runtime is online and connected to AWS IoT or not.
Finally, the provisioning feature enables to create runtime-specific credentials when onboarding runtimes using EDP. The provisioning script included in the client requests to register the runtime, and retrieves the runtime-specific certificate from EDP.
The structure of the EDP Client zip file is shown below.
.
|-- build.info
|-- com.aicas.edp.client-<version>.jar
|-- conf
    |-- logging.properties
    ‘-- system.properties
|-- provisioning.properties
|-- provisioning.sh
‘-- README.md

1 directory, 7 files
Provisioning Script
The EDP Client includes a Bash script that supports an automatic approach, allowing users to bypass certain manual procedures during installation. The main advantage of this automation is the provision of multiple devices in parallel.
This script (provisioning.sh) is responsible for downloading the necessary certificates, copying files, updating configurations, and starting services on target devices. It supports simultaneous provisioning using CSV files, and logs the whole process for each device.
Provisioning Multiple Runtimes
Through the use of a CSV file users can implement automatic provisioning in multiple runtimes. The file, named provisioning.csv, should have the following columns:
_dev_ : the hostname of target runtime, such as localhost or <user>@<remote-ip>.
_framework_ : the name of the OSGi framework, can be either JamaicaAMS, Felix, or Equinox (case-sensitive).
_framework_path_ : the path of the OSGi framework root directory. In case of JamaicaAMS, the path is the directory that contains the sub-folders bin, conf, lib and bundle.1.
_bundle_path_ : the path of the OSGi bundles on the target runtime. In case of JamaicaAMS, it could be bundle.123, for example.
_env_ : the environment of the runtime provisioned for. It can be either DEVELOP, STAGING, or RELEASE (case-sensitive).
_thing_ : the unique name of the Thing.
After entering the paths to the configuration and CSV files in the provisioning.sh, users can run the script.
An example of CSV, as well as the pre-requisites and settings necessary to establish multiple provisioning, are presented in a README file that is part of EDP’s distribution (as seen in the listing above).
Please remember that this provisioning workaround is currently supported for devices running aicas’ JamaicaAMS, Apache Felix and Equinox. For other use cases, all manual steps described below are valid. On the other hand, the steps that are already covered by the automatic provisioning will be clearly indicated.
Initial Settings: IoT Endpoint
In terms of general configuration, users must see that the correct IoT endpoint is declared, so that the EDP Client residing in the device can communicate with the EDP web portal. In the AWS console, the endpoint can be found at AWS > IoT Core > Connect > Domain configurations.
The value of the endpoint must find its way into conf/system.properties, as seen below.
# Please adapt the paths to the policy files as needed
java.security.policy=./conf/all.policy
edp.client.keystore=./conf/example.p12
edp.client.iot-endpoint=<edp-client-iot-endpoint-found-at-AWS-IoT-Core>
Nevertheless, when using the script for automatic provisioning of devices running JamaicaAMS, the IoT Endpoint should not be manually declared directly in conf/system.properties. Instead, its value must be entered in the file provisioning.properties.
The same applies to all other properties, as exemplified in the following list. During initial settings, the property values will be read by the provisioning script, and automatically transferred to conf/system.properties.
$ cat distribution/src/main/resources/provisioning.properties
# Global Device Provisioning Configuration
#
# This file contains the global configuration of device provisioning.
# It is highly recommended to put this file in a restricted environment, e.g.,
# protect it not accessible to other users on your system, and set restricted
# file permissions, e.g., ‘chmod 600 provisioning.properties‘.
# aicas EDP authentication server (Keycloak) URL.
EDP_AUTH_SERVER="<aicas EDP authentication server URL>"
# aicas EDP web server URL.
EDP_PROD_SERVER="<aicas EDP web server URL>"
# The realm
EDP_REALM="<realm>"
# The aicas EDP IoT Endpoint
EDP_IOT_ENDPOINT="<iot endpoint>"
# The username of the aicas EDP user account with privileges to provision devices
EDP_USERNAME="<username>"
# The password of the aicas EDP user account
EDP_PASSWORD="<password>"
Generation of Certificates
Please note that the two steps described below are only to be manually performed for devices not running JamaicaAMS. In which case, all actions related to the generation of device certificates, their storage and the acknowledge of their paths in system.properties are automatically taken care of during the initial settings by the provisioning script.
Moving forward, the device certificates must be generated and stored. In the EDP web portal, under the user menu options, access to the Swagger APIs is provided, so that device certificates can be generated.
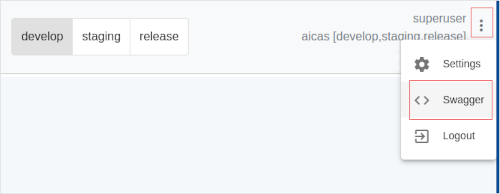
Access to the Swagger APIs
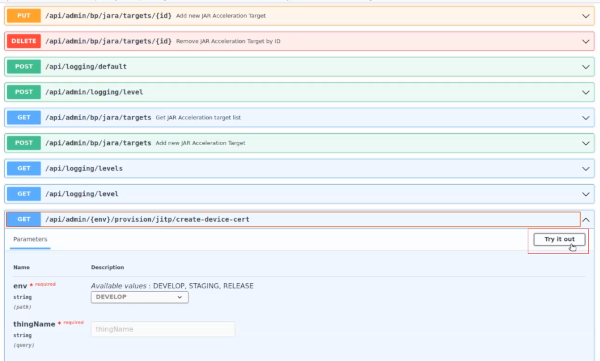
Note: In case there is a failure in the device certificate generation, it might be needed to restart the EDP instance. For more details on how to restart an EDP instance, please see the troubleshooting section of the EDP Deployment documentation.
Once the certificate is downloaded as .p12 file, it should normally be saved in the folder /conf. The path to the certificate also needs to be entered in system.properties.
Step by Step
Following is an example, applied to Raspberry Pi, on how to set up a device to work with EDP. Apache Felix and JamaicaAMS will be taken as OSGi framework examples.
Setting up a Raspberry Pi
Please note that, for devices running JamaicaAMS, only the step 1 of the actions described below is needed. The other settings are executed by the provisioning script included in the distribution.
For example, the EDP Client artifacts will be stored by the script in the folder bundle.3 , to ensure that, as described in step 2, the runtime automatically installs and starts them. The script will also store the keystore file in the folder jamaicaams>/conf/ , as covered by step 4.
1. Copy the OSGi-runtime to the Raspberry Pi: This can be done by either using SSH or MicroSD card.
2. Copy the EDP Client to the Raspberry Pi: This can be done by either using SSH or MicroSD card. The EDP Client artifacts should be put in a location such, that the runtime can automatically install and start them.
3. Get a device certificate: A device certificate .p12 file is required to connect your device to EDP.
4. Copy the device certificate to the Raspberry Pi: You can copy the device certificate either by SSH or MicroSD card. Put the file in a location such, that the runtime has read access.
5. Configure the OSGi runtime: Edit the configuration file of the runtime so that the properties required by the EDP client are properly loaded. In general, the only necessary setting would be edp.client.keystore=<absolute-path-to-the-device-certificate-file>.
6. Start the OSGi runtime: When the EDP Client runs well, the device shall appear as “online” on the Runtimes page of the EDP web portal.
Using Apache Felix
Download Apache Felix 7.0.5 from https://felix.apache.org/documentation/downloads.html and unzip it to the following folders:
felix-framework-7.0.5/bin
felix-framework-7.0.5/bundle
felix-framework-7.0.5/conf
felix-framework-7.0.5/doc
Download the EDP Client
Copy Apache Felix to the Raspberry Pi: Copy the unzipped folder felix-framework-7.0.5 to the Raspberry Pi in /home/pi/felix-framework-7.0.5
Copy the EDP Client to the Raspberry Pi: Copy the Client artifacts to /home/pi/felix-framework-7.0.5/bundle for device provision of Raspberry Pi Linux armv7-le
Copy the device certificate to the Raspberry Pi, as described above. Supposing you already have a device certificate, for example es-0001.p12, you will need to copy this file in /home/pi/felix-framework-7.0.5/conf and append the following lines in /home/pi/felix-framework-7.0.5/conf/system.properties: edp.client.keystore=./conf/es-0001.p12 (if the file system.properties does not exist, it needs to be created)
Start the connection: A Java runtime is needed to run Apache Felix
sudo apt install openjdk-8-jre -y
Start Felix
cd /home/pi/felix-framework-7.0.5
java -jar ./bin/felix.jar
When you see a message “Device Shadow Updating”, it means that the Raspberry Pi is connected to EDP. In this example, the runtime es-0001 shall be listed in the Runtimes page of EDP, and its status shall be “online”. Otherwise, please contact support@aicas.com.
Using JamaicaAMS
Download JamaicaAMS: Please contact info@aicas.com to request the latest version of JamaicaAMS
By unzipping the JamaicaAMS distribution, you will see the following structure:
.
|-- bundles.optional
|-- doc
|-- example
|-- license
‘-- setup
    |-- bin
    |-- bundle.1
    |-- bundle.2
    |-- bundle.3
    |-- conf
    ‘-- lib
Download the EDP Client
Copy JamaicaAMS to the Raspberry Pi: The folder jamaica-ams/setup contains the OSGi runtime. You need to copy the following folders to the Raspberry Pi in /home/pi/jamaica-ams/:
bin
bundle.1
bundle.2
bundle.3
conf
lib
When JamaicaAMS is deployed, the provisioning script will run and take care of the necessary steps for the connection. Logs will be displayed and clearly inform if the Raspberry Pi was successfully connected to EDP, in which case the device shall appear on the list of the EDP Runtimes page. Otherwise, please contact support@aicas.com for help.
During provisioning, the runtime shows as “online”, but when the provisioning script stops executing, it turns to “offline” since JamaicaAMS no longer runs. However, users can restart JamaicaAMS to connect to EDP with their own auto-start programs. If it is needed to manually start JamaicaAMS, log into the Raspberry Pi and enter:
cd /home/pi/jamaica-ams/
./bin/jams
Auto-Connect Raspberry Pi to EDP
Optionally, create a System Daemon Service to start JamaicaAMS when the device boots.
As a first step, log into Raspberry Pi and create a file named jamaica-ams.service in the folder /home/pi/jamaica-ams/ with the following content:
[Unit]
Description=JamaicaAMS
Wants=network-online.target
[Service]
User=pi
WorkingDirectory=/home/pi/jamaica-ams
EnvironmentFile=/home/pi/jamaica-ams/conf/environment.properties
ExecStart=/home/pi/jamaica-ams/bin/jams
Restart=always
[Install]
WantedBy=multi-user.target
Then install the created jamaica-ams.service to the Raspberry Pi by typing the following commands:
cd /home/pi/jamaica-ams
sudo install -m 644 jamaica-ams.service /lib/systemd/system/
sudo systemctl daemon-reload
sudo systemctl enable jamaica-ams.service
sudo sync
JamaicaAMS will start automatically after rebooting the Raspberry Pi. You can start using:
sudo systemctl start jamaica-ams.service
A runtime es-0001 shall be listed in the EDP portal, and its status shall be “online”.
Additionally, here are some useful commands to control JamaicaAMS:
Start JamaicaAMS service:
sudo systemctl start jamaica-ams.service
Stop JamaicaAMS service:
sudo systemctl stop jamaica-ams.service
Enable autostart of JamaicaAMS service after device reboot:
sudo systemctl enable jamaica-ams.service
Disable autostart of JamaicaAMS service after device reboot:
sudo systemctl disable jamaica-ams.service
Get current status of JamaicaAMS service:
sudo systemctl status jamaica-ams.service
Get logs of JamaicaAMS service:
journalctl -f -u jamaica-ams.service
Remove JamaicaAMS service:
sudo systemctl stop jamaica-ams.service
sudo systemctl disable jamaica-ams.service
sudo rm /lib/systemd/system/jamaica-ams.service
sudo systemctl daemon-reload
sudo sync
Note that GoGo shell will immediately terminate JamaicaAMS running in the background, since the inputs expected by GoGo shell are not provided in this case. This can be avoided by adding the property “gosh.args=-noninteractive” in conf/system.properties, or using a terminal multiplexer to invoke JamaicaAMS, e.g., “screen -dm ./bin/jams &”.